Fujin; Making Process
Face Piece
 image1.jpeg |  image4.jpeg |  image2.jpeg |
|---|---|---|
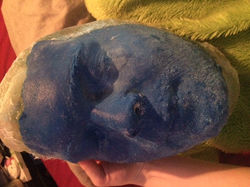 image3.jpeg |  image6.jpeg |  image7.jpeg |
 image9.jpeg |  image2.jpeg |  image3.jpeg |
 image4.jpeg |  image5.jpeg |  image6.jpeg |
 image7.jpeg |  image8.jpeg |  image9.jpeg |
 image10.jpeg |  image11.jpeg |  image12.jpeg |
 image13.jpeg |  image14.jpeg |
Hands
 image2.jpegI mixed up alginate and poured it into a cake tin to cast my model's hand and reported with the other hand. |  image3.jpeg |  image7.jpeg |
|---|---|---|
 image8.jpegI then poured plaster directly into the moulds to create the plaster positives. The hands weren't perfect, but as I wasn't using them for moulding purposes, it didn't matter. |  image5.jpegThe plaster broke slightly, but I learnt from making ears before than applying super glue to one half and licking the other will stick them back together very well. |  image19.jpegI applied 3 layers of scopes parting agent on each hand before I started sculpting. |
 image20.jpeg |  image21.jpegI added most of the clay to the knuckles and joints so the hands looked bigger and more menacing. I also added the cracked areas with monster clay, just like on the face. |  image22.jpegFloating off clay is something I learnt about when making brow pieces for Dramatic contexts. I left them in the bath in cold water over night. |
 image2.jpegThe pieces floated off really well. I flattened them onto a wooden board and smoothed out the edges. I tried not to smooth them out too far, as I was worried that they then would be too big for my model. |  image5.jpegI pressed in sand, sculpted on texture and used sand paper to press on rough texture. I then built up my walls using my clay extruder. I then applied vaseline to all exposed board and then moulded them |  image7.jpegI then mixed up my silicone and poured it into my mould from a height to eliminate air bubbles. |
 image8.jpegThe moulds came out really clean. |  image5.jpegI tried out 2 different bottles to try and spray in my cap plastic layers. Both bottles misted water but then when I sprayed the IPA and cap plastic mix it came out really thick and blobby, even when I tried adding more IPA. |  image13.jpegI painted on 3 layers of cap plastic and IPA in a 3:1 ratio. I then Poured in my silicone (deadened 25%), scraping it off as thin as possible and then applied 2 more coats if cap plastic and IPA. The pieces came out really well with really thing edges. |
Nails
Head piece
 image23.jpegStarting to sculpt the piece on the red head. I kept checking from all different angles, as symmetry for this piece was imperative. |  image4.jpegI then had to make a fibreglass copy of the red head so that I could use it as a part of the mould, as obviously I couldn't use the actual red head. |  image5.jpegI used plat gel 10 silicone to cover the area of the red head that i wanted to use. Unfortunately I added way too much thixo to the silicone which meant it wasn't curing. |
|---|---|---|
 image6.jpegI plaster bandaged over it and put it under a hood drier to try and speed up the curing process |  image8.jpegUnfortunately when I took it off, some of the silicone was left on the piece. But as I only want the rough shape of the head, small misshapen areas won't affect the final piece at all. |  image9.jpegI then fibreglassed into the silicone and was then ready to start sculpting after a vibrosawed and sanded the piece down. |
 image6.jpegI added texture by dotting with sculpting tools, pressing salt and sand into the clay and pressing in sandpaper into flatter areas. I covered the sand paper with vaseline before moulding, as I didn't want it to stick. |  image5.jpegAs I was going to mould this piece as a 2-part fibreglass mould (the bottom piece acting as the core) I need to make a wall down the middle of my piece. I started doing this in clay, but was then advised that it might be better to use thin metal or card instead. |  image7.jpeg |
 image8.jpegI didn't have any metal sheets so I bought some card to use instead. I pushed this down the middle of my pieces, which was quite difficult, as the piece was thick, and the card had to go quite far down. Before fibreglassing, I covered the core in polywax about 3 times and covered the card in vaseline. |  image11.jpegWhen fibreglassing the piece I used a lot of the mud mixture (layup resin and talc) to fill in the large gaps on the sculpt so that when it came to fibreglassing, working around these areas would be a lot easier. |  image12.jpegI then covered this side of the fibreglass with polywax 3 times and sprayed Macwax as well. |
 image13.jpegHere you can see how I painted on the mud layer. |  image14.jpegFibreglassing finished |  image15.jpeg |
 image16.jpegI then use a vibrosaw to neaten up the edges. I think I could have fibreglassed a little further out at the top to give more symmetry and more areas to have drill holes but I think it will still work effectively. |  image19.jpegLooking up to the light to see where to drill |  image17.jpegSeparating and cleaning out the mould |
 image18.jpegI used a 6mm for the holes to put screw through and a 2mm for the bleeder holes. I put 2 bleeder holes right at the end of the piece, as when I inject it, these will be the highest points. As the piece is almost separated in the middle, I also did 2 injection sites in the middle of each section with the 6mm drill. |  image1.jpegNearly all the sandpaper came out of the piece ok |  image2.jpegI think because of the texture and also the shape of the mould, it was very hard to get rid of all the clay. I used soap, polywax and lighter fluid and there was still a small amount of residue which I think will affect the texture when I run it, |
 image3.jpeg |
As I knew my model couldn't shave, as he was in a play at the time, I wasn't sure how much of his face I was going to be able to cast. Luckily his beard was quite short, short enough to include his lower face in the face-casting process. This means I will be able to do my facial design in 2 parts; the nose and above area and then the chin area. This will give the performer more facial movement when acting.
We covered his faciial hairs thoroughly with nivea before applying platsil gel10, mixed in equal parts with a little pigment to make working easier. We applied one thin detail layer, and then mixed up another batch with some polyfibres to make the face cast thicker. We then went over this with bandages and when they were dry, removed the cast from the model.
The silicone picked up a lot of detail and the cast came out really well. All the indents caused by the beard will be removable with a dremmel after fibreglassing.
I fibreglassed straight into the silicone, using a little blue pigment so I could see my surface clearer. I then used a dremmel to remove the obvious protrusions caused by the beard when casting the model. I extended the mould out slightly, which I will need to go back into and do neater, otherwise it could interfear with the moulding process later on.
I then started sculpting the upper face appliance in chavant clay. As there is essential symmetry in this piece, I kept checking it from all angles to make sure the cheeks and brows were level and ensure there weren't any indents or raised areas.
Once i'd sculpted the primary forms, I begain to add texture. I added texture in several way with all my pieces.
1. I'd press sand and salt into the clayto give that rough, grainy, statue texture. I did this mainly on the cracked sections, as I wanted them to be rougher than the rest of the statue
2. I'd press sandpaper onto the clay to give quick rought texture. This is did all over on most of the pieces
3. On any flat enough areas of the sculpt, I would actually push the sandpaper into the clay with the textured side faceing outward, so that the mould would pic up on the texture. There weren't really any large enough sections on the face, but I used this on the head piece a lot.
4. I would also use a sculpting tool to dot in some rought textured areas
I also added extra sections of clay on top of the sculpt to act as the flaking off cracked sections. I tried to do these predominantly in monster clay, as I thought that would maintain the thin shape better when it came to moulding, whereas I felt chavant might just bend under the moulding material. I then added the grounding and was ready to mould.
I then fibreglassing the face, releasing it with 3 layers of polywax and a spray of Mac Wax. I did about 2 layers of fibreglass matting. After I vibrosawed the edges clean I then drilled 4 holes in the semi-circles in the grounding. At this point I did accidentally drill straight through the cheek and thought i'd totally ruined my mould, but then I learned that I could just fill the hole with car body filler and it was totally fine. I also drew circles around any bleeder holes as they could be difficult to see amoung the fibreglass.
The mould came apart really easily and looked really good. I drilled an injection site into the nose, as that was the thickest part of the sculpt.
 image 1 |  image3.jpeg |
|---|---|
 image2.jpeg |  image4.jpeg |
This was the method I followed from a youtube video on how to make claw nails.
Slide 1: I started with the acrylic nails and rounded off both ends so it was more rounded and less of a square shape.
Slide 2: I then sculpted on them with fimo clay
Slide 3: Finished nail ready to put in the oven
Slide 4: Finished set of nails. I measured them on the plaster positive of my models hand to check that they fit properly. I then put them in the oven for 20 minutes on 100 degrees. Despite testing one previously, when I took these nails out, a lot had cracked down the clay and started peeling away from the nail and others were still soft, completely unusable. I will have to use another method to make the nails.
 image16.jpeg |  image17.jpeg |
|---|---|
 image1.jpeg |  image2.jpeg |
 image3.jpeg |  image4.jpeg |
I decided instead to make the nails from long fake nails the I would file down and texture.
Slides 1&2: Nails that I ordered
Slide 3: I cut down the nails to the rough shape I wanted and then used sandpaper to make them smoother. As there was the pointy end left from cutting them, I made another set of nails from the cut off ends, meaning I had 2 sets so that there would be lots of options so that they would definately fit my model.
Slide 4: I then covered the nails in superglue and dipped them in salt to add a rough, stoney texture which worked really well, as I didn't want them to look smooth like fake nails. I thought about building up the thickness of by maybe painting on some resin, but I think they'll be fine.
Slide 5&6: Finished nails ready for painting. I am going to paint them exactly the same as the rest of his body; green with some cracked areas.
I will attatch the nails with nail glue and blend them into the paint scheme of the hand pieces.
Running the Headpiece
 image2.jpegThis was my first attempt running the piece. I used four cubes of gelatine which I thought would be enough but it clearly wasn't. |  image3.jpegHowever, despite my worried about the shape making the piece difficult to remove, it popped out fairly easily. I applied a layer of vaseline and macwax to all the mould surfaces before running the piece each time. |  image1.jpeg |
|---|---|---|
 image15.jpegI found the piece released really well but always stuck more resiliently to the bottom of the mould. |  image16.jpeg |  image17.jpegThe second time was a lot more successful. The mould clearly works, I think its just the amount of gelatine I'm using thats the problem. |
 image18.jpegThe third time was really close but didn't quite reach the very end of the piece where i'd put the bleeder holes. I realised after I injected it that there was a pool of gelatine accumulating on the floor from where some of the gelatine was pouring out of the top of the mould which was really annoying. |  image19.jpeg |  image20.jpegWhere the gelatine didn't quite reach. |
 image2.jpegFor my 4th attempt I covered all the edge of the mould with lebeau clay to prevent the gelatine from leaking out of the bottom so it filled as much of the mould as possible. |  image6.jpeg |  image5.jpegThis time the piece came out almost perfectly. The gelatine still leaked out a little bit, but i managed to stop it leaking with more clay and injected a little more so that it came out of the bleeder holes. |
 image3.jpegThe flange around the top is so much thicker than the flashing which I find quite strange and hard to understand why. |  image4.jpegI don't know if it was just because of the gelatine, or the remaining clay in the mould, but I found the texture that i'd spent ages sculpting into all my pieces really didn't show up as much as id've liked. I think I need to 'over-sculpt' slightly more in future to ensure this doesn't happen. |
 image7.jpegI injected the face with gelatine for the first time. This way if there are any problems with the mould I won't have wasted silicone and I can re-use the gelatine. I didn't realise it at the time, but I'm really lucky i sculpted the outlet points where I did. They are at about the highest point of the mould, whereas if i'd sculpted them near the bottom then all the material would have just flowed straight out of the mould. |  image1.jpegThe piece actually came out really well for the first attempt, although there were some very slight air bubbles in the far ends of the brows and the highest points of the cheeks. So I drilled some small bleeder holes in these areas (2mm) to try and eliminate this issue. |  image10.jpegI ran the piece in gelatine again to see if the air bubbles had been eliminated and the piece came out almost perfect so its now ready to be run in silicone. |
|---|---|---|
 image9.jpeg |  image8.jpeg |  image14.jpegMy first attempt injecting the piece with silicone. I pushed clay into the bottom to make sure no material came out from there, as my other mould made me slightly paranoid. |
 image15.jpegI painted about 3 layers of cap plastic and IPA mix in a 1:3 ratio on both the mould and the core. |  image16.jpeg |  image6.jpegThe piece came out really well although the edges were really thick. I think I painted on too much cap plastic but I also think a little silicone got too far into the edges as well. |
 image17.jpeg |  image5.jpegThe second time I painted on 2 layers on both the mould a core and the edges came out much better. Still with a little silicone at the bottom of the cheeks, but not bad. Definitely a useable piece. |
Running the Face Piece
Painting the pieces:

Unfortunately I forgot to take photos of the finished painted pieces, But the all had approximately the same paint scheme. They were all painted with PAX paint, an off-white in the cracked open sections with grey and beige discoloured spots. I also added slightly different green tones to some areas on the hands and faces, to make the statue look worn and old.
I was slightly worried after reading in my research that PAX paint doesn't work on silicone, but it seemed to work fine on gelatine and silicone. The green definately dried a different shade to the colour it is when mixed.
I also added more texture while I was painted, by adding some sand and salt to the paint to make it look less smooth and more gritty. It stuck on because of the pros-aide in the paint.
I pre-mixed lots of the green and white PAX, putting them in airtight bottles so that I could use them on the day of the assesement. This way I didn't have to waste time mixing it on the day and I would have the same colour prepared.
I decided to paint the bald cap on the day.


 image10.jpegI made a latex bald cap in the traditional manner, with a layer of flashing. My model's template was huge on the red head so I had to guestimate a little. |  image11.jpegI also added some sand into the liquid latex so that the cap would not be totally smooth |
|---|---|
 image14.jpegI tried the cap briefly on my model and it was nowhere close to fitting. |  image18.jpegI put it back on the red head and stippled as many more layers of latex as I could to try and make the cap big enough for the assessment |
Bald Cap
I also sculpted, moulded and ran a flatpiece along with the hand that was about the size of half a page of A4. This was going to be put on my models chest but once I realised he didn't want to be topless, I planned to put it on his neck area.


I also added slight discolouration to some sections to the paint, as I didn't want it to look too monotonous. I also wanted the statue to look quite old, so I added this discolouration to show natural weathering of the paint.


I decided to also experiment with silicone paint just in case it gave a better effect than PAX. I mixed up lighter fluid and unibond sealant.
I first tried mixing it with acrylic paint which didn't work at all, the paint just went really dotty and didnt mix at all.
I made a new batch and added in greasepaint makeup which seemed to mix in really well. I knew my silicone pigments would work and I wanted to experiment and the greasepaint seemed to work effectively.
I painted on the first layer, and it was very translucent - far to translucent for the affect I wanted to achieve.
After about 5 layers, the colour was building up, but nowhere near the opaqua look that I needed.
I can see how effective this painting style would be for other makeups, but it doesn't suit my design at all.
I think something that could have really helped me when sculpting the hands as flat pieces would have been to draw around my model's hands in sharpie on the board I floated the pieced onto. This way I would have had more of an indication where to stop the edges of the piece.
The edges on all my flatpieces came out really well.
© 2023 by Tennis Lessons with Karen. Proudly created with Wix.com