
The Construction of a Lace Front Wig
Lace front wigs are used extensively for stage, TV and film. As the name implies, the
front of the wig is made from very fine lace, almost invisible.
In this clip from Joseph's Amazing Technicolour dreamcoat, you can
see the edge of the bald cap and the wrinkling of the fronting lace.
You can also see the microphone wire, but this is from a zoomed in
perspective; the audience wouldn't be aware of this. Lee
Mead's wig looking almost identicle to his real hair. The reason a
wig was made was for continuity purposes and so that a microphone
box could be hidden under the lace.
In industry you will meet an actor to take the template for the wig, and
then again to put the wig on. Rarely will you see them again in between,
so it is crucial that measurements are taken correctly.
Template Process:
- Do not gel or wet the hair. Prep the hair as if you were if you were going to apply a wig . You could either do plaits, french plaits or big pin curls. It depends on the style of the wig and if it has a side or a centre parting. If the wig has a centre parting, it is best to replicate this on the actor. Wrap up the hair like a bald cap.
- Cross-grip 4-5 anchor points. The optional one is the point at the centre front of the head. If the wig is very flat, then you don't want an obvious bump to show, so you would forgo this point.
- 3 people for a template fitting
- Take photos and notes of the style at the time so that this can be replicated when applying the wig
- You have to be able to see the hairline all the way around
- Apply the clingfilm to the head in one big piece. Ask the artist to hold the centre front and pull the sides down flat so that it lies flat against the sides of the face. Cross the clingfilm over at the back and push down the top
- Apply a layer of sellotape
- Then take the 8 measurements for the head. These are not used to make the wig, but to check to template on the wooden block before making it.
- Measurements: circumference of head (2cm behind hairline), centre front to nape (go no further than the crease of the neck), width of nape, top of ear to corner of nape, ear to ear over the top, ear peak to ear peak around the forehead, temple to temple across forehead, temple to temple around the back of the head.
- Cut against your hand to remove the ear area from the the template. The back should then feel slightly loose, so overlap the template slightly and re-sellotape it to tighten it
- Then draw on the hairline, marking where the centre front is and where any partings are. Draw and square it off at the back and write on the circumference aswell
- Apply a scond layer of sellotape over the sharpie
- The template should slide off. If it doesn't, cut a slit and remove and then add more clingfilm and sellotape so it still fits accurately
- In industry, at this point a sample of a the actor's hair would then also be taken. A razor would be used to feather a sample from the front, and one from the back. These would be taped to a sheet and sent to a hair merchant who would colour match the hair and send the required amounts.
Attatching the Template:
- The foundation should be constructed on a wooden block, as a malleable block can distort and move. The circumferences are written on the bottom of the blocks
- Cover the block with sellotape so you can draw the template onto it.
- Fit the template on the block so you can visualise it sitting there. The circumference of the template should be touching the block. You shouldn't have to padd around the circumference, or you've got the wrong sized block.
- Then use tissue or cotton buds to padd out the template
- To divide up the template into the 3 sections, measure back 6-8cm from the centre front and draw a dot. Go around making dots, make sure they're symmetrical and join them up.
- 6-7cms back from the fronting lace is where the foundation lace should start. 7cm from the centre back, and then construct a circle.
- Apply the foundation lace first. Pin to the block symmetrically, using 2 pins at the edges faceing away from eachother to keep it taught.
- Overlap 1cm at the back and whip the overlaps.
- Trim away excess (leaving 1cm)
- Make a small slit where the ears crease to make the seams easier
- Fold outer edges up and underneath and secure them with points. Then whip
- When placing the caul net, you want to be able to knot the hair as horizontally straight back as possible
- Pin the caul in place and then pin in the darts which should fall down
- whip these darts and the 2 laces together
- Applying the fronting lace: hold it flat to the face (not the head, or the lace will stick out incorrectly on application). It should overlap the foundation net 1cm. Be aware of sideburns (for male wigs). No pins down the middle section of this lace as it could mark or tear the lace, so have all the pins quite far back. Then hold lace back and pin at centre front over the foundation lace. Darts here are ok, but NOT directly around the hairline. Need to manipulate dart so it lays more across rather than straight down into the lace...... So its nowhere near the single knotting area. Real lace will lie nice and flat. Direct dart backwards as hair is brished backwards. Then whip front to foundation lace with the 1cm overlap and whip along the overlap aswell. Whip darts. DONE.
For a wig with a parting:
Wrap lace around the face the same and then press flat against the parting. Darts will then be moe irregular and based around the parting.
muppetdoodle (2007) Close every Door - Lee Mead in Joseph. [online] Available from:https://www.youtube.com/watch?v=-QA0MMUSJqM&spfreload=10 [Accessed: March 4th 2015]
 image1.jpeg |  image2.jpeg |  image3.jpeg |  image4.jpeg |
|---|---|---|---|
 image5.jpeg |  image6.jpeg |  image7.jpeg |  image8.jpeg |
 image9.jpeg |  image10.jpeg |  image11.jpeg |  image12.jpeg |
 image13.jpeg |  image14.jpeg |  image15.jpeg |  image16.jpeg |
 image1.jpeg |  image2.jpeg |  image3.jpeg |  image4.jpeg |
 image5.jpeg |  image6.jpeg |  image7.jpeg |  image8.jpeg |
 image9.jpeg |  image10.jpeg |  image11.jpeg |  image13.jpeg |
 image6.png |  image4.png |  image3.png |  Finished foundation |
 image14.jpeg |  image15.jpeg |  image16.jpeg |
 image1.jpeg |  image2.jpeg |  image3.jpeg |  image4.jpeg |
|---|---|---|---|
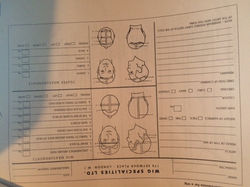 image5.jpeg |  image6.jpeg |  image7.jpeg |  image8.jpeg |
 image9.jpeg |
 image8.jpeg |  image9.jpeg |  image10.jpeg |  image11.jpeg |
|---|---|---|---|
 image12.jpeg |  image13.jpeg |  image14.jpeg |  image15.jpeg |
 image16.jpeg |  image17.jpeg |  image18.jpeg |
My Attempt:
I found this quite challenging overall. Attaching and padding out the template was not difficult, although I had to do it on a malleable block rather than a wooden one which wasn't ideal. I also found the smaller pins would come out of the block so I used bigger pins which meant I couldn't do the task as neatly with the precision that is required in constructing a wig foundation.
I didn't realise that darts were allowed when pinned on the foundation lace and mine was really frumpy. I also knotting it off'centre so I would have to re-do the whole thing in order to create an accurate foundation. As I don't intend to make any wigs for my project or in future, I will re-do it if I have time, but I would rather focus on broadening my knowledge of prosthetics.

Musgrove, J. (2002) Make-Up, Hair and Costume for Film and Television London: Focal Press
This gave me more insight into the context of wigs and wig making. I also wasn't aware that small boning can be added to a wig to help give shape and strength.
 image1.jpeg |  image2.jpeg |  image3.jpeg |
|---|---|---|
 image4.jpeg |  image5.jpeg | 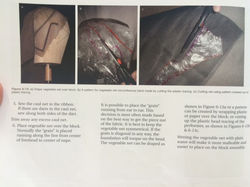 image6.jpeg |
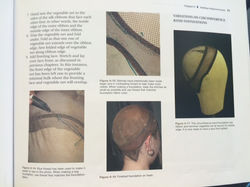 image7.jpeg |  image8.jpeg |  image9.jpeg |
 image10.jpeg |  image11.jpeg |  image12.jpeg |
 image13.jpeg |  image14.jpeg |  image15.jpeg |
 image16.jpeg |  image17.jpeg |  image18.jpeg |
Ruskai, M and Lowery, A. (2012) Wig Making and Styling. A Complete Guide for Theatre and Film. Oxford: Focal Press
I consider this book the authority on anything wig related, and it had an incredibly comprehensive guide on the different kind of wig foundations and which ones are suited for which type of wig for which purpose, etc.
© 2023 by Tennis Lessons with Karen. Proudly created with Wix.com